Create your first backup with NotionManager
Now you have NotionManager installed on your device. This is the first how-to to start use NotionManager to protect your Notion data.
This guide walks you through making your first backup, from creating a Notion integration to browsing the finished copy offline. It takes about ten minutes.
What you'll need
- A Notion account with the pages or databases you want to back up.
- NotionManager installed on Windows, macOS, or Linux. You can start on the free plan.
- A Notion integration token (we'll create one in the next step). This is how NotionManager is allowed to read your content.
That's it. No credit card, no cloud account.
Step 1 — Create a Notion integration and copy its token
NotionManager talks to Notion through Notion's official API. To use it, you create an "internal integration" and copy its secret token.
-
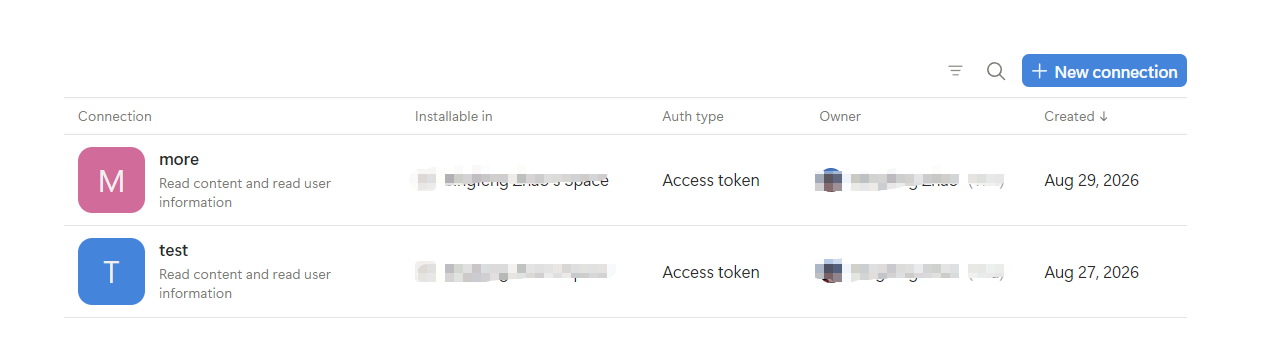
Open notion.so/profile/integrations. (In the app you can also click Open Integrations during setup.)
-
Click New Connection.
-
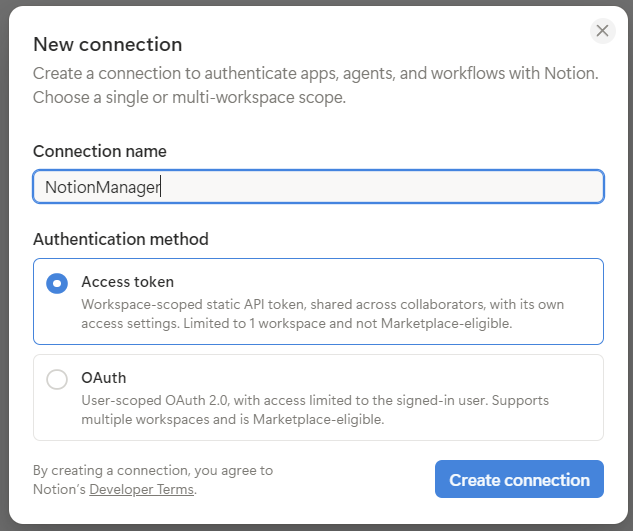
Give it a name like
NotionManager, make sure you select Access Token under Authentication method, and then click Create Connection. -
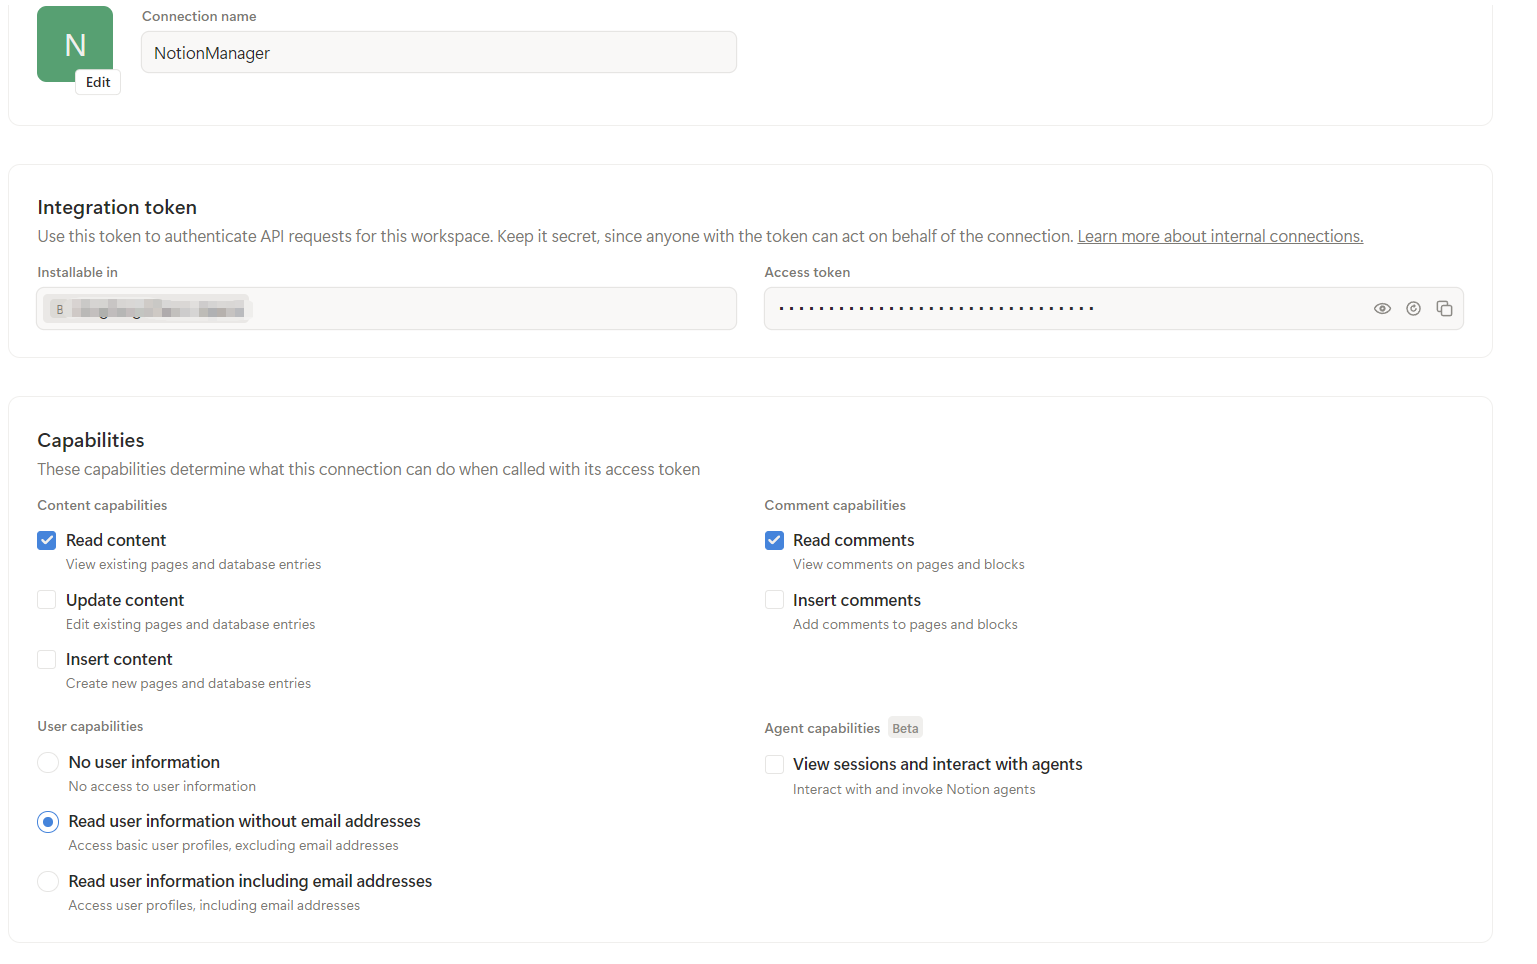
Now configure the permissions of the newly created connection:
- Select Read Content and unselect "Update Content" and "Insert Content". NotionManager only needs read permission to do the backup.
- Select Read Comment if you want to back up comments as well.
- Make sure you select Read user information without email addresses ("Read user information including email addresses" is also fine, as NotionManager does not require user emails) since NotionManager needs user names for better local rendering.
-
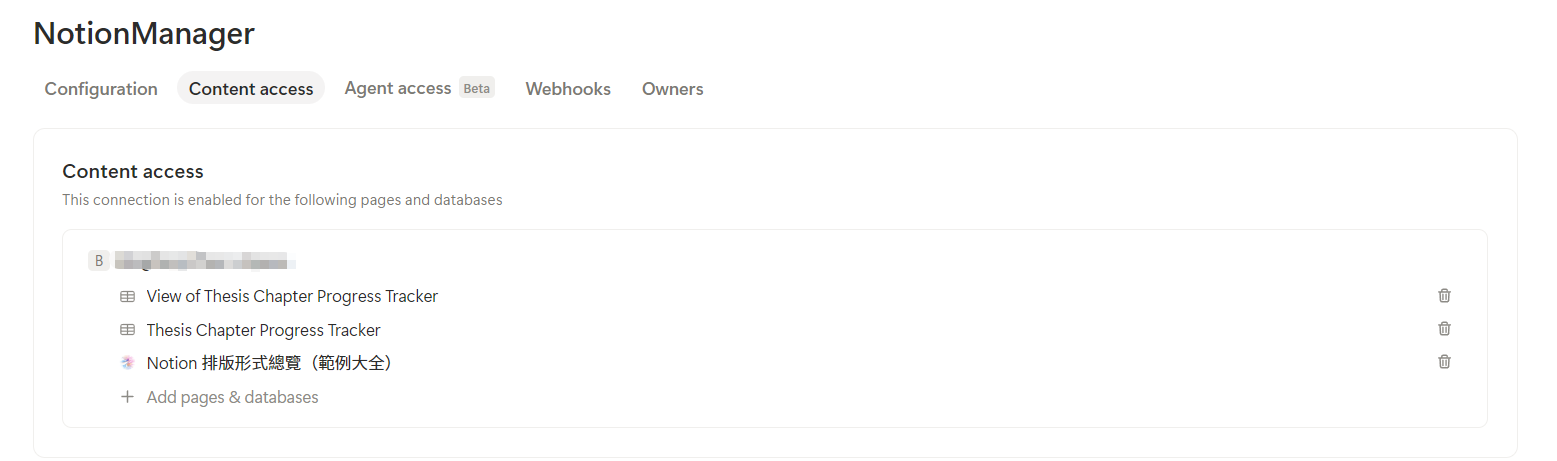
Configure the access content of the connection:
- Click the Content access button.
- Click Add pages & databases to select which pages and/or databases are going to be backed up. Here two databases and one page are granted.
Tip
You may notice that from Notion's perspective, only top-level pages and databases can be shared. NotionManager provides finer control on this.
-
Copy the access token from the connection and keep it private. Anyone who has it can read the pages you share with it. You can paste the token into NotionManager, as demonstrated later.
Note
Notion may change its interface without notification, and you may see different UI from this.
Step 2 — Create a backup profile
Open NotionManager and go to the Profiles page. A profile bundles everything about one backup: which Notion token to use, which pages and databases to copy, where to store them, and an optional schedule. You can create several profiles later — for example, one per team or one per client workspace.
Click Create Profile and select New Profile to launch the setup wizard. It has four steps.
2.1 Name & Location
- Backup Name — a label for this profile, pre-filled with a timestamp. Change it to something meaningful like
Personal WikiorClient A. - Backup Directory — where the copy is stored. Leave it empty to use the default location, or click Browse to choose a folder.
Pick an empty folder that isn't inside your Notion export or synced in a way that could cause conflicts. A dedicated drive or a folder included in your own machine backups works well.
2.2 Connect Notion
- Paste the integration token from Step 1 into the Integration Token field.
- Click Verify. NotionManager checks the token and extracts all granted resources.
- Once verified, you'll see a tree of every workspace-level page and database the integration can access.
- Check the items you want to back up. You can expand databases and nested pages to be selective, or keep the defaults to include everything shared with the integration.
You need at least one item selected to continue.
2.3 Schedule (optional)
You can enable automatic backups here. On the free plan this step is skipped — backups are started manually, which is perfectly fine for a first run. If you have a paid plan, choose a daily or weekly time, or switch to a custom cron schedule on higher tiers.
You can also set a per-profile retention policy (for example, "keep the last 5 backups" or "delete backups older than 30 days") if your plan supports it. If you're not sure, leave both off for now; you can change them later by editing the profile.
2.4 Review and create
The last screen summarizes the name, destination, token type, number of items, and any schedule or retention settings. Click Create Backup Profile.
Your profile now appears in the left-hand list on the Profiles page.
Step 3 — Run your first backup
With the profile selected, click Backup Now in the Backup Config panel. A new job appears in the Recent Backups table and starts running.
A few things to know while it runs:
- The Task Tree below the job list shows exactly what's happening, page by page and block by block. You can expand nodes, filter by status, and hide the noisy block-level and database-row-level tasks if you prefer a high-level view.
- You can Pause or Cancel an in-progress job from the Recent Backups table.
- Attachments (images and files embedded in your pages) are downloaded to your computer too by default, so the offline copy is complete.
When the status turns to success, your data is safely on disk. Open the Report button on the job for a detailed breakdown of pages, databases, rows, blocks, comments, downloads, API calls, and any warnings.
Step 4 — Browse your backup offline
This is the fun part. In the Recent Backups table, click Browse on the completed job (or double-click the row). NotionManager opens a local, read-only view of your workspace that looks and behaves like Notion:
- Navigate pages and databases exactly as you'd expect.
- Switch between database views and open rows.
- Use full-text search to find anything across the backup (available on paid plans).
- Turn on Full Width for a roomier reading layout.
Because everything is stored locally, this view works with no internet connection at all. It's a genuine offline copy of your Notion, not a cache.
Step 5 — Automate it (optional)
Once your first backup works, you can let NotionManager keep it current:
- Scheduled backups — set a daily or weekly schedule in the profile's settings so you never have to remember to click Backup Now.
- Retention — automatically prune old backups so the folder doesn't grow forever.
- Remote browsing — securely browse your local backups from another device on your network.
- Repository import/export — move an entire backup repository between machines.
Troubleshooting the common hiccups
The item tree is empty after verifying the token. The integration doesn't have access to any pages yet. Go back to Step 2 and share at least one top-level page with the integration in Notion, then click Refresh in the wizard.
"Invalid token."
Make sure you copied the whole token, including the ntn_ or secret_ prefix, with no leading or trailing spaces. If the integration was deleted or its token was regenerated, create a new one.
A backup finished but something looks missing. Open the job's Report and check the Warnings and Errors counts. Usually the cause is a page that isn't shared with the integration, or an attachment that couldn't be downloaded. Fix the access in Notion and run the backup again — it will pick up what's missing.
The backup is taking a long time. Notion has strict API calling limitations, and if the content is large, a complete backup takes time. Monitor the task tree, and if there is progress, you can leave it running in the background. Progress is saved, and interrupted jobs can be retried. So a sudden power outage or the app being killed unexpectedly will not break the backup job — just resume it.
Where are my files? In the backup directory you chose in Step 2.1, or the default location shown in the wizard if you left it empty. All data is saved in a local database.
Wrapping up
You now have a complete, browsable, offline copy of your Notion workspace stored on your own machine — and a repeatable process to keep it up to date.
The workflow to remember is simple:
- Create a Notion integration and copy its token.
- Share the pages you want with that integration.
- Create a backup profile in NotionManager.
- Run the backup and browse it offline.
Do that once, and you'll never be one accidental deletion away from losing years of notes again.
Comments
No comments yet. Be the first to share your thoughts!
Leave a Reply
Your email address will not be published. Required fields are marked *